According to their IT Providers and Help Desks
- VPN: What is it? Why is it important? Why does it cause many tickets?
- Printer: How can you prevent printer issues? What causes most printer issues?
- Software and/or Computers are slow: What causes software to be slow? What can employees and/or you do have software run most efficiently?
- User error/Education: how can a business professional become the most tech savvy in a short and easy time period?
- Networks Shutdown or Kicking Me Out or Slow
- Blue Screen of Death: what is it? Why does it happen? What should you do when you get it?
- How to Best Avoid Password Issues
- I Can’t Log In
-------------
VPN
Common VPN connection problems:
All this connectivity is a threat to privacy and security online. VPN is not only effective to access the restricted content available online but is also extremely helpful in protecting the identity online which has grown to be a very serious concern nowadays. That is why experts recommend shielding your identity and privacy online through VPN. The growing use of VPN calls for understanding the common VPN problems. Following are some of the most common VPN issues:
- Non-responding VPN server
- Your ISP (internet service provider) is blocking the access to VPN
- When old VPN packages interfere with the new ones
- The set firewall is interrupting your connection
We have gathered some quick fixes to these problems that will get you back online in a matter of seconds. Here are the fixes that will help you resolve all the VPN issues:
1. Clear your device from the previous VPN software:
We often stuff our machine with different VPN software in order to pick ourselves the best one. These different VPNs can get in the way of effective functioning of each other. Therefore, the best practice is to disable and uninstall all the other VPN packages that you have utilised and check if it resolves the issue.
2. Switch the VPN Server:
If you weren’t aware then know that all the VPN service providers’ offer hundreds of servers to keep the things smooth at all times. There are several reasons to do so:
- Overflow of traffic
- If one server gets down
- If a server is blacklisted by the service one is trying to access
Due to these few of many reasons, the VPN service providers offer a multitude of servers. If you’re having a difficulty in accessing the content you desire or experiencing any other server related issue, all the VPN services provide the option of switching between different servers. If you’re using a server of some particular country, an efficient VPN would provide you with multitudes of servers within the same country to keep your operations smooth and flowing.
3. Check the firewall:
Firewalls also sometimes put hindrances in the functioning of VPN as it keeps check on all the data flowing in and out of your connection. Firewalls are protective of the traffic coming to the machines. Most of the firewalls don’t get along the VPNs that well. If you face any issue with your VPN and it doesn’t seem to get resolved, try turning off your firewall. It will most probably solve the issue instantly. However, do not forget to turn it on after you’re done with the VPN.
4. Check if the VPN is compatible with site or service:
There also exist such services and sites, which are not compatible with all the VPN’s. We can take Netflix as an example here. You can access Netflix content from across the globe using VPN (except the countries in which Netflix doesn’t operate). Howsoever, not all the VPNs work well with Netflix. So, it is always a good idea to see if the VPN is compatible with the site or service you are trying to access.
5. Try utilising a different VPN Protocol:
If you’re struggling to connect with VPN, then trying another protocol can be of great help. Protocols are set of rules especially defined to transfer the data securely from one point to another. We all know HTTP is the most common protocol for the transferring of data. It precedes every website you access. If you are facing an issue with your VPN connection, then try switching the protocol. Sometimes these protocols don’t let you access some website or service due to the policies and terms. So, playing with protocols can prove to be an effective way of getting your issue resolved.
6. Get help from the help feature:
All the VPN service providers offer a “help” feature because at some point you are going to need it. Which is very why they ensure that there is an inbuilt help feature to accommodate the users. We often ignore the help function of software but they are very helpful. If you’re really confused about some problem and don’t seem to find any solution to it then reporting it to your VPN provider is the best solution. It will not only get the issue resolved but will also prevent it from happening in the future.
7. Try the OpenVPN protocol:
As the name suggests, an open source protocol has been available for around 15 years. It is quite popular in the VPN world and is extensively used. It is compatible with a range of famous platforms like Windows, Android, iOS, etc. and goes along really well with all the established VPNs. You can try OpenVPN for a solution to your VPN issues. Furthermore, you can also download the client from the OpenVPN website anytime.
8. Regularly update the VPN:
Updates are extremely important in the functioning of software. They are released to fix the bugs present in the previous version or to modify the software. In order to keep yourself away from the VPN issues make sure to keep your VPN updated at all times. The updates of a VPN are essential to keep the day-to-day functionality of VPN smooth and efficient. Well, you must be thinking now how can we get to know that our software is updated or not?
The easiest way to find out is by comparing the version number you’re utilising with the number displayed on the provider’s site. Usually, this information is found in the about section of the VPN software you’re using.
9. Restart your VPN software:
Our go to method to fix any computer or software related problem is restarting it. What makes restarting very simple and effective tip to get the issue fixed? Well, it allows the software or machine to restore its settings. If your VPN is running its own program, then restarting it can be a very good idea. Do the same if you have a VPN plugin.
Printers
Few things lead to frustration quicker than when you need to print something in a pinch, and your printer doesn’t want to cooperate (and it won’t tell you why either!) While streaky lines across your images or faded text is one hassle, dealing with a printer that won’t even acknowledge you exist is another. Whether you’re getting an error message that doesn’t sync up with reality or your printer is giving you the silent treatment, knowing where to start when your printer won’t print can relieve some of that frustration.
Specific troubleshooting solutions will vary depending on your printer model, but once you understand some common issues, you can quickly search and find fixes specific to your unit. Manufacturers offer online resources to help you work through your most troubling printer issues and we’ve got some basic tips covered right here!
Ghost Jams
When your printer says that there’s a paper jam, and there isn’t, chances are it’s because there’s a mechanical problem afoot. Don’t immediately smash your printer in a field though! In searching for a solution for a ghost-jammed HP® printer, Neal Poole discovered that often real paper jams could leave residue behind that interferes with printer operation long after the jam is gone.
Small amounts of shredded paper junk lodged between gears that move your rear duplexer may leave your printer thinking there’s something lodged in the duplexer, not the gear. Examine the mechanical parts surrounding your ghost jam and make sure they operate cleanly (some models give you a more precise idea where the jam is located, especially for more complex office units). Here’s one approach posted on Fixya that can help:
- Remove the rear duplexer and grip any of the four rollers. Do they move freely? If no, your next step is to . . .
- Touch two of the brass contact points with a paper clip. Bridging this contact makes the printer think the duplexer is still installed, and you’ll want to maintain this contact all the way through the final step.
- Press OK on the control panel.
- Take a look at the white plastic gears on the left-hand side. Do they move freely, or do they stall, skip, freeze, or jam? If it’s the second scenario, you have paper shards, which you will need to clear from the gears.
- Grip the furthest rubber roller and rotate. Check for shards of paper in the gear teeth.
- Once the rollers and gears spin freely, you’ve cleared the ghost jam, and you can remove the paper clip and reassemble.
Unplug your printer to reset the sensors if you are still getting a paper jam notice after cleaning.
Printer Driver Problems
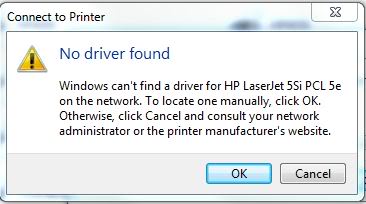
Hardware isn’t always to blame. Your printer driver acts as the translator between your computer and your printer. Like other software, drivers can also go out of date, or lose compatibility with your operating system after an update. You may also have the wrong driver downloaded on your computer to work with your printer. Uninstalling the driver you have on your desktop, then replacing it with an up-to-date version, often will get your printer and desktop chatting again.
Loaded Queue
When your print job finishes, your queue is supposed to clear itself automatically. That doesn’t always work out as planned, especially when some print runs are put on hold, postponed, or stopped due to data connection issues. If your queue gets all blocked up, it can cause your driver to grind to a halt. Often, in an attempt to print something, you’ll end up selecting print several times over, further overloading your queue.
Sometimes your printer isn’t the reason your jobs aren’t printing. A stuck print job can logjam your queue, which prevents jobs from being received by your printer. It also won’t go away when you click delete most of the time. So, what can you do to clear your queue and get your printer, well, printing again? Here’s how to get started:
A side note: this is explicitly for the HP printers paired with Windows, but the general principles apply across printer models and brands.
- Turn your printer off completely and unplug it from your power source.
- Be sure to save the document you are planning on printing, in the form you want it printed. When you clear your queue, all print jobs that haven’t saved will be erased—it will disappear as well.
- Open Windows Services by searching “Services” in your search toolbar or clicking the Window button on your keyboard.
- Halfway down your list of Services, you’ll see one called the “Print Spooler.” Right click on the Print Spooler option and look at your options. “STOP” will halt any stuck print you have bogging down your queue.
- Once you’ve halted all print jobs using the spooler, use the Windows Explorer browser to search: C:\Windows\System32\Spool\PRINTERS
- Delete all existing files in your queue and shut down your computer unit from Windows.
- Turn on your printer using the power button, then turn on your computer again.
- Restart the print spooler service. (Thanks, Garth!)
- Print your document. If it works, you’re done!
If your print queue gets bogged down and freezes again, you have a couple of other options. HP offers a free software called HP Print and Scan Doctor which you can download for free. Running this program will automatically troubleshoot common issues with your printer and resolve them. If you are still having trouble with your queue jamming, uninstall and update your printer driver. Sometimes, an older driver may not be compatible or can corrupt, which will prevent your prints from processing.
Wi-fi Connection
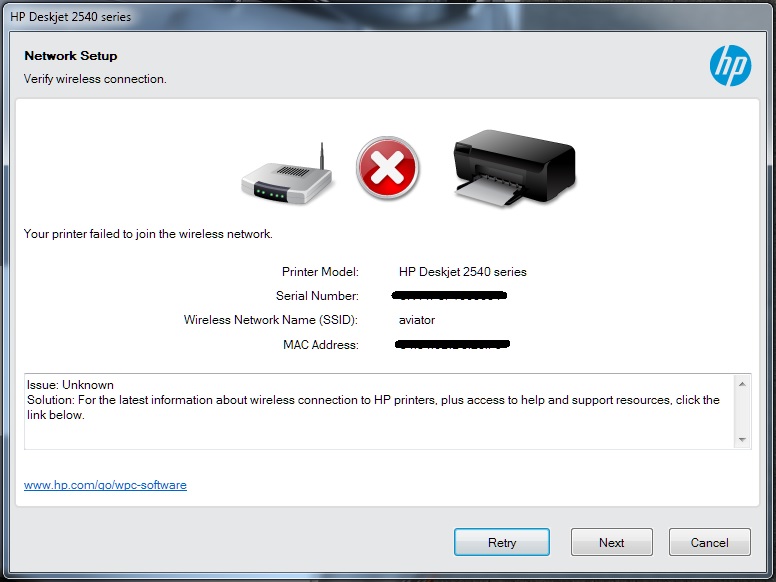
Wireless connectivity is a double-edged blade. On the one hand, you can connect your printer to devices anywhere in your home. On the other, your connection is something that you can’t see. If your printer has dropped its Wi-fi signal, often you won’t be able to tell unless you troubleshoot the connectivity. If your printer’s Wi-fi is down, unplug it and reconnect it to your modem. It’s a bit of a trope these days, but powering down electronics can do wonders for fixing problems. If your device isn’t connecting to your printer, check to see that your Wi-fi and Bluetooth capabilities are up and operational.
A weak (or nonexistent!) connection between your computer and printer will prevent you from getting the documents you need. And because the issues lie between the two, often it can be tough to diagnose. If your printer was connecting wirelessly to your printer and then stopped, try restarting your computer and printer to see if they will reconnect. If no, here are some common questions you should ask when you suspect your WiFi connection may be to blame for your issues.
- Is your printer connected to your network? Printing a Wireless Network Test Report is the easiest way to check and see on HP printers. Go to your control panel and select Wireless Network Test Report (on some models, you can access this directly by hitting the wireless button). This report will give you insights into connectivity, the units connected to the network, and the Network Name (SSID address)—from which you can see if your unit is connecting to the network. Consider restarting your router and printer to reconnect.
- Is your computer connected to the network? For Windows users, select the HP Print and Scan Doctor discussed above to check. For Apple users, click on the Wireless logo in the top right-hand corner of your screen. Is your network checked?
- Was anything on your computer changed recently? Updates to your security software, firewalls, browser, and operating system can result in connection issues with your printer. You may need to reconnect your computer to the network, reconfigure your protection settings to include printers, or install an updated driver, depending on the nature of your updates. If you updated software, consider restoring your system back to the original settings/version to see if that reconnects you.
- Was your router replaced recently? Chances are you’ll need to reconfigure your printer and computer to reconnect with the network. Check to see if your new router is assigned a different ISP address, which will need reconfiguration.
Unable to Print From a Mobile Device
Everyone wants to enjoy the convenience of being able to print directly from their iPhone®, iPad® or Android® mobile device. But wirelessly connecting your printer and device can be complicated, and the process will vary from brand to brand. Even if there’s an app for your printer brand, differences in software could prevent you from connecting directly. Make sure that your WiFi is properly working if you are having difficulty connecting, using the process outlined above. If your wireless printer connection isn’t functioning smoothly, downloading different apps or deleting existing ones won’t help.
Here are some ways to set up your printer for mobile printing, and troubleshoot to see why your printer isn’t connecting:
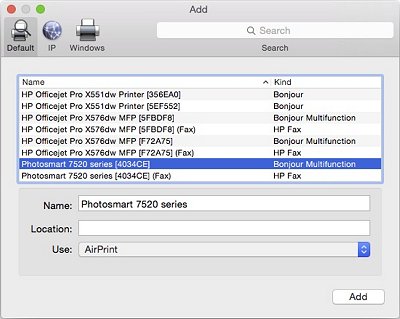
AirPrint for Apple®. Printers from each major manufacturer come pre-loaded with Apple’s AirPrint software, which makes connecting your iPhone, iPad, or laptop simple. AirPrint allows you to instantly print photos direct from your Photo Stream, as well as print directly from your Safari app. Once your printer is set up, here’s how you use Airprint:
- Select the app you want to print from, and tap the “Share” icon (HERE) or “Settings” icon (HERE).
- Select (HERE) or hit “Print”
- Pick a AirPrint-ready printer from the list
Most troubleshooting for AirPrint that doesn’t stem from WiFi glitches come from compatibility issues. Not every app is AirPrint ready, and while AirPrint is becoming more common with newer WiFi printers, not every model comes pre-loaded. Double check your users manual to make sure your printer is compatible. If not, there are other easy ways to connect your Apple products to your printer wirelessly.
Print Apple for Non-Airprint Printers.
Connecting Apple products to non-AirPrint printers isn’t difficult, once you have the necessary tools. Printer Pro is a budget-friendly app downloadable via the App Store for $4.99 that acts as a bridge between your devices and printer.
- Login to the App and select the “Add Printer” option on the bottom left-hand side.
- Your select printer page provides an option to automatically connect to a networked printer or manually add an IP address.
- Choose the option to print a test page and confirm that your settings are correct. If your print isn’t clean, double check your firewall settings to make sure your security isn’t interfering with data transfer. Your test page will also allow you to make sure your print is properly calibrated.
If you’re having problems automatically connecting via Printer Pro, double check your IP address and make sure it matches up. Also, make sure that your firewall settings will allow your device to connect to your printer.
Cloud Print for Android Products.
Google’s Cloud Print is among the easiest ways to directly network your printer with several devices, including both Android and Chromebook products. The process is pretty simple:
- Go to the Google® Play app store and add Cloud Print to your device.
- When you got to settings, Cloud Print will provide you with a list of networked WiFi printers available in your area.
- Connect with the printer of your choice.
- Use Gallery to print saved images in Drive, or drop down to “Print” on your browser.
When connecting a printer that doesn’t come preinstalled with Cloud Print—what Google calls “Classic” printers—you have options as well. Installing third-party software such as GitHub’s Google Cloud Print connector will bridge the software gap between your device’s operating system and your printer.
If your printer isn’t connecting to Cloud Print or producing prints, first check to make sure it’s Cloud Print ready and connected. Many older model printers will have WiFi capability, but won’t come pre-loaded with Cloud Print access (a problem similar to AirPrint). It’s also possible that you may be using an outdated version of Google Chrome, which can prevent your prints from being transferred. Finally, you may have registered your networked printer twice, which means when you’re selecting a printer you’re actually connecting with it’s ghost twin. Check your networked printers list to make sure you have the right one.
Let’s say you’re looking to connect with a printer that isn’t showing up on the printer list. If you have a Cloud-Print-ready printer, you have a couple options here:
- Refresh your printer list
- Update your printer driver. If your driver is out of date, it won’t network cleanly with more recent versions of Chrome.
Alternately, if you have a classic printer, your troubleshooting options include:
- Logout and log back into your Google Cloud Print connector.
- Confirm that you’re logged into the same Google Chrome account for both your print management and Google Cloud Print connector.
- Verify that your printers are installed on the device you’re connecting with the Google Cloud Print connector.
- Confirm that you’re running the most recent OS.
Looking to WiFi printing from your Amazon Kindle? You’re in luck, because Kindle uses Google’s Android operating system, so it’s designed to work with Cloud Print. You can also directly connect Kindle to most wireless printers by finding them on your list of networked printers and selecting print. Like many other devices, Kindle and Android use “Share Page” as the nomenclature that brings you to a print option.
Print from B&N® Nook®.
Downloading PrinterOn® is the easiest way to print from your Nook. This app will connect any WiFi printer to your Nook instantly, and offers a convenient way to review and print web pages, PDFs, images, docs, and more. Here’s what you need:
- Download the app from the Nook App Store.
- Select your printer. You have several options to help you locate the printer you want, including GPS, keyword search, and a location-based search feature.
- Click print!
If you’re having difficulty connecting PrinterOn with your WiFi printers, first confirm that your printer is connected via WiFi where you searched. If your GPS or keyword search don’t send your Nook looking in the right direction, it can get lost. Also, if you are using PrinterOn for business, the app may be password protected to prevent your data from being stolen.
PrintHead Clogging
If you don’t use your printer often, sometimes ink in your printer head will dry and lead to clogging. This may trigger the change cartridge signal on your printer, or could simply prevent ink from making its way onto the page. Unclogging your printer head can be messy and tedious, but maintaining your printer to prevent clogs is easy. A popular way to address a clogged print head is the paper towel method:
Paper Towel Method
To start you will need to have a damp paper towel and a dry paper towel at the ready. Take the warm, damp paper towel and blot the cartridge with the printhead side down onto the towel. The printhead is located on the end of the cartridge where the ink comes out and is typically a gold or copper strip. You should see ink appearing on the paper towel after blotting a couple of times. Be careful not to confuse the printhead with the gold and copper contacts or dots. I know they sound awfully similar…if you don’t see ink you are probably blotting the wrong part of the cartridge! After blotting onto the damp paper towel, hold the cartridge against the dry paper towel for 30 seconds to a minute. This process wicks out any dried ink that may be preventing you from a quality print. Once complete, slide the cartridge back in the machine and run a test print. Often times this does the job quite nicely. If not, repeat the process again. If the second time doesn’t cut it move on to our next tip, printhead cleaning!
Only printers with an integrated printhead can use the paper towel method. If you have a printer that uses individual color cartridges, like the Epson® 220 series, the printhead is built into the printer. Most common culprits for a clogged printhead are microscopic dust particles, air bubbles or dried ink. Running a printhead cleaning on your machine will clear the print nozzles of excess or dried up ink. Though the setup might be different for each printer, this is a typical cleaning function built into the printer’s software. Consult your user’s guide to find the cleaning process that will work for you. Print a test page to see if the clog is gone, print a second one to be sure (sometimes two will do the trick). If that does not clear up the issue, stop doing any further cleanings as this use up a lot of ink and running multiple cleanings in a row doesn’t usually render better results than the first.
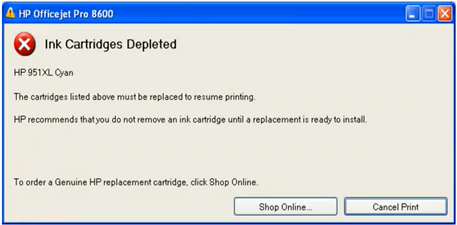
“Non-Genuine” cartridge message
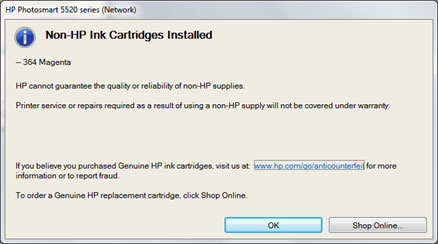
On occasion, your printer will directly call you out for using a third-party ink cartridge. Especially common with HP printers, this kind of message will pop up on your screen, telling you that you’re using a used, refilled, or counterfeit* cartridge, but usually won’t do much else beyond that. Third-party cartridges usually have chips installed that circumvent this message, but when it does pop up you can easily diffuse it by clicking “okay.” If not, consider removing your cartridge and ensuring the chip is clean, then reinstall and try again.
*Counterfeit cartridges are those intended to look like an OEM cartridge. Compatible cartridges that come in their own packaging are not fake contrary to what OEM manufacturers are leading consumers to believe.
New Cartridge Not Working
Every once in a while you might come across a genuine brand cartridge that gives you trouble. If you have recently installed a genuine cartridge and an error machine pops on your printer’s display, take these steps to try and fix this issue:
- If you still have your old cartridge on hand, try plugging it back into your unit. Often, your printer will start right back up, and in many instances, you’ll find there was still ink left in the old cartridge! Once the old cartridge is acknowledged by your printer, remove it and replace it with the new cartridge again. Sometimes a quick cartridge swap can convince your printer to accept the new cartridge.
- Double check to ensure you removed protective seals. New cartridges come sealed at the ink nozzle to prevent the ink inside them from drying out. For some brands, a piece of tape with a tab will create this seal, for others, it’s a plastic piece. If you try to install a new cartridge into your printer without removing the seal, it may register the cartridge as installed but not allow ink to flow.
- Check the vent. HP cartridges come with a vent that allows ink to flow smoothly. When this vent is blocked, it can prevent ink from leaving the cartridge. Check on the top back of the cartridge for an orange pull tab, and if this has been removed, you can clear the vent with a pin.
- Run an extended cleaning cycle. If your printer has been sitting around for a while, the ink resting in the printhead can dry up and clog. Running an extended cleaning cycle will remove any unnecessary ink blockages and get your ink flowing again. If your prints are coming out smeared or extra faint, a cleaning cycle can help fix that as well.
Replace the Cartridge / Low Ink Message
Sometimes, your printer will give you a message saying you need to replace your cartridge, or you have low ink, even when you know you have enough ink. Perhaps you installed a fresh remanufactured cartridge full of ink, but your printer still thinks that the old cartridge is in place. You have a couple of options available to get your printer, well, printing again:
- Reset cartridge counter. Some printer models feature a cartridge counter that may need updating when you install a fresh cartridge. Epson Stylus printers in particularly have a cartridge counter that can be reset by holding either the “Cleaning” or “Load/Eject” button for three seconds. Check the owners manual to see if there’s a reset cartridge counter option available for your model.
- Disable low ink messages. Another option is to override your low ink message. Different operating systems and printer models may vary slightly on how you achieve this end, so check your owners manual for specific details.
- Right click on your desktop screen and click the “All Apps” icon. From there, click the icon that launches the print application for your printer.
- Here, your options may vary, but click an icon that reads “Configuration,” “Tools” or “Utilities.” From here, you’ll be able to access the Estimated Ink Levels application. This will hopefully update your computer to the ink levels in your cartridges automatically. If not, you can turn off notifications by going into Advanced Settings and enabling “Do Not Show Me Low Ink Level Warnings,” or a similar option, and clicking OK.
Printer Hardware Problems
a. Check Your Power Cord
The problem may not be your computer or your printer at all. Connector cables such as USBs will decay and burn out over time, requiring replacement. Unfortunately, they don’t have indication systems your printer and computer have so that they can die, and you’d never know otherwise. Try swapping your printer out with another cable. Keeping an extra connector cord on hand will help you troubleshoot instantly, and get you printing again faster if your USB is to blame.
b. Ran out of RAM / Memory
Modern printers are highly sophisticated devices. Most units today have some form of memory to store print jobs, whether it be a couple of megabytes or several gigs worth in a large office risograph. If your printer is connecting, but printing at such a slow rate it may as well not be, you’ve likely run out of memory.
Software is Slow
1. You have too many startup programs
Newly downloaded programs often try to weasel their way into your Startup menu (Windows) or Login Items (Mac). If you didn't uncheck the box for that permission, you could have dozens of unnecessary programs vying to be ready and running as soon as your computer boots up (as if that's happening any time soon).
“The most common cause of a slow computer is too many startup programs,” says Aaron Schoeffler, computer repair doctor at LaptopMD. “90 percent of programs want that permission to start when your computer starts so that you’ll use them, and that can result in a boot time of five to ten minutes. When it finally does start, a ton of programs are already running in the background and if you’re not using a newer computer, that can slow it down.” While some programs – such as antivirus and firewall software - should be allowed to run from startup, others – such as iTunes or Microsoft Office – could quite easily stay closed until you actually need to access a file from their digital depths.
Mac: Applications / Systems Preferences / User Groups / Login Items, then uncheck unneeded programs. Delete desktop icons you don't use by trashing them or, in the case of files you've saved to your desktop for convenience, reorganizing to the appropriate folder.
Windows 8 and 10: Windows key + X / Task Manager / Startup tab, then right-click on the programs you want to remove and select Disable.
Windows 7 and older: Start button, then search for System Configuration. Go to Startup tab, then uncheck each of the programs if you don't want starting when the system boots up.
2. Your hard drive is failing
“A hard drive nearing the end of its lifespan is a common issue. Hard drives are made of moving parts that spin thousands of times a day and they do wear down,” says Schoeffler “Generally, after two to three years of consistent use, there’s a high chance that a hard drive is failing.”
How to Fix it
Run a hard drive check:
Windows 7, Vista: Windows Explorer / Computer / right-click on drive / Properties / Tools / Check Now. You can select “Scan for and attempt recovery of bad sectors” which will prevent your computer from accessing any “bad” areas of the hard drive, but can also increase the scan time to a few hours.
Mac: Head to Applications / Utilities / Disk Utility, then highlight the hard drive in question and click First Aid at the top of the screen.
In general, avoid dropping, throwing or otherwise causing impact to the hard drive to extend its lifespan. At some point, you might consider upgrading your hard drive too: “We tend to recommend upgrading to solid-state drives,” Schoeffler says.
3. Your hard drive is 95% full
When your hard drive gets to 95 percent full, computers can slow down by 50 percent, Schoeffler estimates. “At this point, there is no space to save the temporary files required for operating programs, so it’s as if the OS doesn’t know how to run properly anymore,” he says.
Hard drive space is taken up by programs, updates to programs, and downloads, as well as temporary files and associated files of deleted programs, so you may be able to clear a good amount of space just by emptying your trash. Check your hard drive situation by (Mac) clicking the apple and selecting About this Mac, or (Windows) hitting Start / Computer and right clicking the primary hard drive (usually C:), then go to Properties.
Fix it.....
Deep clean your computer of unnecessary files from unused programs to defunct downloads and temporary files. This might include bloatware that manufacturers preload onto computers that are supposed to run utilities or cleanup. System backups and restore points also can take up a huge amount of space, so don’t keep more backup versions than you really need. To optimize space, you might also want to move files to a cloud storage service. Schoeffler recommends the free program CCleaner (Mac/Windows) to easily delete unneeded files, including the glut of temp files created by browsers, for instance.
Wondering about that ancient computer cleaning ritual defragging? That’s only if you’re for some reason still using Windows XP or older – newer Windows PCs and all Macs do not require manual defragging.
4. Your browser has too many add-ons
Browser extensions can usefully enhance your web experience (like an ad-blocker or a unit converter I use) – but they might also be a culprit in slowing down your computer by eating up processing power. Nor are all extensions created equal - some add-ons may proclaim themselves popup blockers or search protectors, but they may be browser adware that can slow your computer down by downloading ads and popping up ads every time you open your browser.
Fix it....
Disable or remove the extensions and toolbars you don't really need:
Firefox: Hit the menu button on the far right, select Add-ons / Extensions, then select disable or remove for each item on the list.
Chrome: Right-click on any extension button / Manage Extensions, then uncheck the box to disable a particular item, or click the trash can to wave it goodbye. You can also check how much memory each extension is using by hitting the top-right menu button (three vertical dots) then More Tools / Task Manager / Memory where you can sort all browser processes by memory used. The extensions will be preceded by a puzzle piece icon.
Safari: Hit Safari (top left) / Preferences / Security / Extensions, then select an item to uninstall. You can also turn off all Extensions here.
Internet Explorer: Tools / Manage add-ons / Show All add-ons, then select the offender(s), and click disable or remove.
Edge: Setting and More / Extensions, then remove any you don't need.
5. You're running too many programs at once
Doing a trillion things at once is exactly why we have computers but, at some point, your little bundle of artificial intelligence is going to falter. Your computer's ability to run multiple programs at the same time hinges in part on its RAM (random access memory), which allows it to switch from processing one program to another with seeming fluidity, but if the demands of the open programs are outstripping your computer's memory and processing power, you'll notice a slowdown.
Fix it
Head into Task Manager (Windows; Ctrl+Alt+Del) or Activity Monitor (Mac; Cmd+Space, type into Spotlight bar), recommends Schoeffler, to see which programs are open and sucking up processing power:
Then shut down those you don’t need. For Macs, Windows 10, Windows 7 and earlier versions of Windows, you can close the programs from the file menu. In Windows 10 and 8, programs are built so that they run in the background for a while, then automatically shut down. But if you want to manually shut one down and ensure all associated files shut down with it, drag from the top of the screen to the bottom, and hold there until the icon flips over.
6. Too many browser tabs are open
If you're in the dozens of open tabs camp (“All the better to never lose a link”, you claim), your browser is likely hogging far more than its fair share of RAM. “When you open a new browser tab, it’s saved in RAM. If you have only a little bit of RAM left free, you run out of room for processing everything that is active, so the computer slows down,” Schoeffler says
Multiple open browsers can slow down the works, too, and you get extra slow points if any tabs are also auto-refreshing (say, a live blog). What's more, having a glut of browser tabs full of supposedly crucial information doesn't exactly help our efficiency or mindfuless.
Fix it
Bookmark those “necessary” links (for organization's sake, in a Bookmarks folder titled “To Read”) and shut those tabs down. Even better, One-Tab for Chrome and Firefox does the work for you, compiling all your open tabs into a simple list on a single tab, which can then be accessed as needed.
7. Rogue programs are hogging all the processing powers
It's not always a heavy-duty video or music app that's eating up your computer's processing power. Some programs or system processes may be stuck in a loop or have encountered an error.
Fix it
Check how much processing power programs and processes are using by heading into Task Manager (Windows) or Activity Monitor (Mac). For both, click the “CPU” tab to order the programs by how much processing power they're taking up. If a program that you're not actively using is still up there in the top few programs, you can select to quit the process.
And, when it comes to browsers, Internet Explorer is especially heavy on your computer, says Joe Silverman, CEO of repair shop New York Computer Help. Most of us aren’t using it anymore– with Chrome and Safari used by the majority of U.S. netizens – but hold up before gleefully uninstalling: “You don't have to run Internet Explorer but don't remove it [if you got it bundled with your Windows PC] – it could cause problems as it's very tied to the operating system,” he says.
8. You have an overzealous antivirus program
Having an active anti-malware program is a vital part of computer hygiene – but yours may be running regular background scans at the worst possible times. “Virus scans slow down the works because they're running in the background,” Silverman says. Some antivirus programs may be set to weekly full scans, which can take a few hours and suck up a lot of processing power.
Fix it
Head into your antivirus settings and configure it to scan late at night when you aren't using the computer. (However, that feature may not be available on some free antivirus programs – which makes a good case for upgrading.)
9. You have a virus
If it's not the antivirus, it could be the virus. Viruses, spyware and other malware can slow down your computer as they mess around with everything from hijacking your browser to pushing advertising or phishing sites, to crashing your computer. “These days, viruses most commonly install a malicious program that runs ads randomly, which is an easy way to generate income for its creator,” Schoeffler says.
Fix it
Run a malware scan. Schoeffler recommends using the free Malwarebytes (Mac/Windows) as an anti-malware cybersecurity tool. We also recommended Bitdefender Total Security and Symantec Norton Security Premium.
10. Someone is using your computer for cryptomining
A sluggish computer could signal that a program or ad is using your system to mine cryptocurrency. Often, this occurs because of code on a website and that is active only while the site is open. In fact, some legitimate sites such as Salon use it as a system to generate income instead of users viewing ads (users can opt in if they agree).
“Without your permission, a website could have an extension that uses your computer’s processing power to mine a cryptocurrency,” Schoeffler says. “It’s a legally gray area because it’s not directly doing or adding anything to your system.”
Cryptomining (also called cryptojacking) can also be the result of malware that downloads to your computer – like the Digimine virus that spread through the Chrome version of Facebook Messenger - then runs in the background, mining away and sending information back to its creator.
Fix it
Shutting down your browser will halt the browser-based cryptomining. To figure out if you’re inadvertently downloaded cryptojacking malware, head to Task Manager (Windows) or Activity Monitor (Mac) and see what’s making demands on your processor. “Whether it’s a virus or browser-based cryptomining, you’ll be able to see if something is using your processor for its own needs,” Schoeffler says.
11. Your OS is way too slick
It's the age-old battle of appearance over performance: Having visual effects enabled – aka eye candy like those snazzy transitions for minimizing windows – can impact the speed of your PC (and to a lesser extent, Mac), if its hardware only just skates within the minimum requirements for your OS of choice.
“If you have a good video card – that's 1GB of RAM on the video card or better – you're OK,” says Silverman. “But less than that, [having visual effects enabled] can slow your computer down.”
Fix it
Windows 7 and older: Start / Control Panel / Performance Information and Tools / Adjust Visual effects, then click Adjust for best performance or manually choose which effects you'd like to keep.
Windows 8 and 10:Windows key + X / System / Advanced System Settings / Performance Settings / then select as above.
Mac: System Preferences / Dock, then for minimizing applications, change that super-swish Genie effect to a utilitarian Scale effect (basically just disappearing). Uncheck “Animate Opening Applications”.
12. Your room is too dusty
Sometimes the problem is not internal but external – is the back of your CPU casing matted over with dust? This can prevent ventilation which cools the processors as they whir away in an attempt to run Photoshop, Spotify, Outlook, and Skype. And nobody wants a hot computer – heat increases the likelihood of malfunctions and crashes.
As for laptops, any time you notice your laptop heating up, you should check that its vents, usually on the sides, aren't blocked. For example, don't put your laptop on something soft like a pillow where it can sink in.
Fix it
Dust off the ol', um, dust. If it's really severe, you can use a vacuum cleaner (carefully) or a canister of compressed air.
13. You don't have enough memory
If you've deep-cleaned your computer and modified your browser tab habit, but your computer is still slow (and you own a PC), you might want to consider a minor upgrade in the form of additional RAM.
Some programs take a lot of your computer's RAM to run – for example, programs that work with huge files such as photo or video editing software. “A lot of people try to run Photoshop or some graphics-heavy program on an entry- or mid-level computer that can't handle it,” Silverman says.
Fix it
If you’re watching videos and playing music, 2GB of RAM should do; and 4GB-8GB if you do graphics-heavy work on your computer. Fortunately, upgrading the RAM on your PC is inexpensive and a task most people can handle themselves. To learn what RAM upgrade options are available for your computer, try Kingston's memory options tool.
14. You need to restart your computer
The reason restarting seems to solve so many tech issues is that programs can get hung for a myriad of reasons. “A lot of stuff gets gummed up in the background. For example, if you turn off Outlook, background processes are still running,” Silverman says. “You could 'end task', but a lot of folks are not that savvy about which one to end.”
Instead of manually digging into Task Manager (Windows) or Activity Monitor (Mac) to divine the root(s) of the sluggishness, restarting flushes out the system, a panacea for those rogue, resource-hogging programs and a clean slate free of files and fragments.
Fix it
Bite the bullet and shut things down. You even get the added benefit of having critical system updates applied that can only happen during a reboot.
15. You're running in low power mode
Some Windows laptops give you the option to adjust your power settings to maximize performance. Go to Control Panel > Hardware and Sound > Power Options and select "Create a Power Plan." If your computer lets you adjust the speed of your components, you'll see three options: "Balanced," "Power saver," and "High performance." Select "High performance" and create a plan name. You'll then see a screen where you can select your power plan. Select your new plan. Creating a power plan that's based on "High performance" will maximize the performance of your computer automatically.
User Error
Completely eliminating user error is impossible. No matter how hard we may try, it simply isn't feasible to expect to completely eliminate user mistakes from the scope of issues that affect managed IT services. So what is the next best thing? Well, it would seem like identifying the most common forms of user error and taking the best measures to prevent those issues is a good start.
With that in mind, we reached out to the people who know user error best, you! We asked you (via Reddit and Spiceworks) to tell us about specific cases of user error that you see the most and how/if you attempt to educate your clients in order to reduce or eliminate those mistakes.
What Are Users Doing?
The term "user error" covers a wide scope of issues. User error can mean anything from dropping a computer and damaging the internal drive to clicking on a cleverly disguised email that contains malicious content. But what are the specific mistakes that you are constantly seeing that have you pulling your hair out? Well, we asked this very question on both Reddit (MSP subreddit) and Spiceworks and your responses were quite interesting. Take a look!
Passwords and Logins
Passwords and logins seemed to be a recurring theme throughout our threads. Whether it was impatience with the login attempt or users simply forgetting their account information, passwords and logins were the front runners when it came to examples of user error.


Email and Internet
Social engineering has made it difficult for users to distinguish a harmful spam email from a legitimate one. As "ColtsFanMN" mentions, users really need to think hard and examine attachments and links before clicking them.


Not Being Proactive
The final issue that we heard about may be the easiest to prevent. If a user doesn't report an error, it can be very difficult or even impossible to fix. Of course, with Remote Monitoring and Management (RMM), often times you won't need the end user to report the error. Still, it doesn't hurt.

What are You Doing About It?
After looking through your responses, what we already knew was verified - user error is an issue. Although it can seem impossible to break users of their bad habits, we gathered insightful and helpful responses on methods that you are using to discourage unsafe behavior.
Inform the User
Never forget that you are the expert. Although some users may not take the time to read the "best practices" documentation that you provide, it certainly doesn't hurt. Offering consistent updates on current risks and vulnerabilities is a good way to keep the information fresh in their minds and hopefully reduce the amount of error that the user is causing.


Eliminate the Root Cause
One participant has developed an interesting approach to reducing user error. In addition to providing the users with helpful information, "snewoh" described some measures that he/she has taken to eliminating the root cause of the issue.

In the end, eliminating all user error is a difficult, if not impossible task. From what we have heard from you, the best course of action is to make all of the necessary information available to users and set them up for success to the best of your abilities.
Network Shutdown
With the proliferation of smart home devices, online gaming platforms, and video-streaming services, maintaining a strong internet connection is more important than ever. If you're experiencing lag while playing League of Legends, or it takes forever to download music, there's a good chance the problem is on your end and not an issue with your internet service provider (ISP).
Try Another Device or Website
Start with the obvious: is the problem only happening on one device or all your devices? If your computer's having problems, see if your tablet can connect to the internet, or if your spouse or roommate's laptop works. If the problem only happens on one device, you can safely narrow the problem down to that particular machine.
Make sure Wi-Fi is enabled and that you are connected to the proper SSID using the correct password. If you're running Windows, right-click on the network icon in your system tray and select Troubleshoot Problems to run the Windows Network Diagnostic routine. This can sometimes correct common issues by resetting the adapter. Also, check your network adapter settings to make sure the adapter is using the correct gateway address and other settings.
Similarly, try another website. If you can visit other websites just fine, it's likely that the problem is with the website you're trying to visit, and you'll have to wait for them to fix things on their end. (You can also try typing the website's address into downforeveryoneorjustme.com—if the site appears to be up but isn't working for you, try visiting it in an incognito window, another browser, or clearing your browser's cache and cookies).
Scan for Viruses
Sometimes your internet connection can be affected by malicious code on your computer. Do a scan for spyware, viruses, and malware, all of which can have a significant impact on your web-surfing speed and overall system performance. Windows 10 comes with Windows Defender built-in, which can do the job nicely—but there are plenty of free and subscription-based utilities available as well.
If your internet is working, but is working slower than expected, head to a site like Speedtest.net and run a speed test. You'll get a number in megabits per second denoting the speed your computer is actually experiencing.
From there, head to your ISP's website and check your bill—if the number on your bill is the same as your speed test, then you're getting the correct speeds you pay for. If that feels too slow, you'll need to upgrade to something faster. If your speed test is significantly slower than the speed you pay for, then you are indeed having problems, and should continue with troubleshooting.
Bypass Your DNS Server
When you type a website into your browser, your computer looks up the IP address of that website using a DNS server. Occasionally, these servers can have problems, making it difficult to visit websites using their friendly domain names (like PCMag.com). It's like having a working phone with no contact list—you technically have the ability to call people, but you don't know anyone's number.
Try bypassing your DNS server by typing an IP address into your browser, like 216.58.197.78 (which is one of Google's IP addresses). If the page loads properly, you'll need to change your DNS server, or maybe flush your DNS cache to fix your problems.
Decode the Blinking Lights
If you can't connect to the internet at all, take a look at your modem and router. Both should have a few LED status indicators—if none of them are lit up, then the modem or router is probably unplugged or powered down. Disconnect the power cord—if you have both a modem and a router, disconnect them both—then reconnect the modem after a minute or two.
Make sure that the power switch is in the On position, if there is one. Once its lights are on, plug in your router (if applicable) and wait for it to boot up as well. If you still don't see lights after plugging them in, you may have a failed power adapter, a faulty power strip, or a fried router.
If some of the lights are on, but some aren't—or they're flashing repeatedly—you'll want to look more closely at what they're telling you. For example, if your modem's lights are flashing rather than solid, it may be unable to find an internet connection, necessitating a new modem (or a call to your ISP).
If your router's network light is on but the Wi-Fi lights aren't, you may need to press the Wi-Fi button on the side, or re-enable Wi-Fi from its configuration menu. Check the documentation for your modem and/or router to diagnose what these lights are telling you.
Who Else Is Using the Internet?
It's possible that everything is working properly, but a program on your PC—or someone else in the house—is using up all your bandwidth. On Windows, open up the Task Manager by pressing Ctrl+Shift+Esc and click on the Network column to sort by network usage. On a Mac, press Command+Space to open Spotlight, type "Activity Monitor," and head to Activity Monitor's Network tab.
If a certain app is using a lot of bandwidth—like if you're downloading a big file—you may just need to wait until that process is finished, or cancel it to get your internet snappy again. If you don't see any obvious culprits, see if someone else in the house is downloading a large file on their machine, and tell them to knock it off. You might even have a neighbor stealing your Wi-Fi.
Get a Better Signal
If you're using Wi-Fi, there are plenty of problems that can slow down your connection. Try connecting your computer directly to the router with an Ethernet cable. If that solves the problem, then your Wi-Fi signal is poor enough to degrade your internet speed. Check the Wi-Fi icon on your computer: how many bars do you have?
If you're low on bars, you may need to move your router to a more central location in your house, or buy a Wi-Fi extender. (If you already have a Wi-Fi extender, it may just be poor quality—a mesh system will probably do a better job).
If you have full bars but there are a lot of Wi-Fi networks in your building, it may just be too congested, and changing the channel or using the 5GHz band may help solve the problem. Check out our guide to boosting your Wi-Fi signal for more tricks to improving reception.
Update Your Firmware
Firmware is the low-level embedded software that runs your modem, router, and other network hardware. Most vendors provide downloadable firmware updates that can resolve performance issues, add new features, and increase speed. Look for the firmware update tool in the System section of your router's management console and follow the instructions carefully to ensure that you're installing the correct firmware version. Do not download firmware from a third-party site.
If rebooting your router doesn't do the trick, it's possible a certain setting is causing your problem. Try resetting your router to its factory default configuration. For most routers, this involves pressing a very small reset button on the rear panel and holding it down for several seconds until the LED lights begin flashing. Once reset, you can log into the web interface and set it up from scratch. Just be careful not to enable the same setting that caused the problem in the first place.
Upgrade to a Faster Router
If you're using an older 802.11b or 802.11g router, you may want to consider upgrading to a newer, more powerful one, especially if you have multiple computers, smartphones, and other devices vying for bandwidth.
A dual-band router gives you two radio bands to choose from and allows you to dedicate a band to clients that require lots of bandwidth, like streaming video devices and gaming consoles. Moreover, newer routers employ the latest technologies to deliver speedy throughput, with enhanced Wi-Fi range. Check out our list of the best wireless routers when you're ready to take the plunge.
Head to the Source
If troubleshooting your modem and router doesn't help, the problem may come from further down the line. Inspect the connection coming into your home. This is usually located on the side of your house, and may or may not be housed in an enclosure. Make sure that the main cable hasn't been chewed up by a squirrel or knocked loose by debris from a storm.
If you see a cable splitter, make sure each connection is tight and the connectors are properly crimped. If the splitter looks suspect (i.e., rusty or dirty), try replacing it—or, if you don't need to split the signal, try getting rid of it altogether, as cheap splitters can degrade signal strength.
Last Resort: Dial Up Your ISP
If you've tried everything and are still experiencing internet connection woes, it's time to call your service provider. The problem could be on their end, and may require a new connection at the pole coming into your house or new equipment such as a better modem or an amplifier.
If you're experiencing slowdowns at certain times of the day (think after-school hours), it's possible that your ISP is simply unable to handle the increased user load, in which case you may want to find a new service provider. Lucky for you, we've tested them to find the fastest ISPs in the country.
Blue Screen of Death
The blue screen of death—or BSOD—is always an unwelcome sight. BSODs appear when Microsoft Windows encounters a critical error from which it can’t recover, usually the result of low-level software (or drivers) crashing or faulty hardware.
What Causes Blue Screens of Death
Blue screens are generally caused by problems with your computer’s hardware or issues with its hardware driver software. Sometimes, they can be caused by issues with low-level software running in the Windows kernel. Regular apps usually won’t be able to cause blue screens. If an app crashes, it will do so without taking the operating system out with it.
A blue screen occurs when Windows encounters a “STOP Error.” This critical failure causes Windows to crash and stop working. The only thing Windows can do at that point is restart the PC. This can lead to data loss, as programs don’t have a chance to save their open data.
When a blue screen occurs, Windows automatically creates a “minidump” file that contains information about the crash and saves it to your disk. You can view information about these minidumps to help identify the cause of the blue screen.
Blue screens also look a bit different, depending on what version of Windows you’re running. In Windows 7 and previous versions, the blue screen looked much like a terminal screen, displaying all manner of information.
5bsod
In Windows 8 and 10, blue screens are much simpler.
windows-8-blue-screen-header
That’s really not as big a deal as it sounds, though. Even in previous versions, blue screens tended to go by fast enough that reading that information was difficult, anyway. And there are easier ways to get all the details you need for troubleshooting.
Specify Whether Windows Restarts When a BSOD Appears
By default, Windows automatically restarts the computer whenever it encounters a blue screen of death.
RELATED: Help Troubleshoot the Blue Screen of Death by Preventing Automatic Reboot
If you would like more time to see the blue screen details (or just make sure that it’s a blue screen that’s happening), you can disable automatic restarts on BSODs from the Windows Control Panel.
Viewing BSOD Information
NirSoft’s free BlueScreenView application offers an easy way to view blue-screen information you might have missed. It works by displaying information contained in those minidump files that are created during BSODs.
This information is also available in the Windows Event Viewer, where blue screen messages are scattered among application crashes and other system log messages.
Troubleshooting BSODs
In Windows 7, 8, and 10, you can troubleshoot blue-screen information using the Action Center. In Windows 7, head to Control Panel > System and Security. In Windows 8 and 10, head to Control Panel > Security and Maintenance. In the “Maintenance” section, you’ll be able to check for solutions to existing problems.
Windows 8 and 10 actually perform this troubleshooting step automatically when your PC restarts after a BSOD. However, it may still be worth paying a visit to the Action Center to see if there are more details or additional troubleshooting steps.
If Windows can’t fix the problem on it’s own, your best bet for troubleshooting the problem is to search the web for the solution. Scan the blue screen or the minidump file for the specific error.
You may see a “Stop Error” number that looks something like “0x00000024.” Or, you may see an error like “Driver_IRQL_not_less_or_equal.” Either way, a quick search for the exact error will likely yield good results. In fact, Windows 8 and 10 often recommend right on the blue screen that you perform a search for the error.
If you have trouble locating good advice for solving your problem, don’t worry. BSODs can have a variety of root causes. We do have some additional tips that might help you deal with many blue screens:
Use System Restore: If your system recently started blue-screening, use System Restore to roll its system software back to a previous state. If this works, you’ll know that it’s likely a software problem.
Scan for Malware: Malware that digs deep into Windows and gets its hooks into the Windows kernel at a low level can cause system instability. Scan your computer for malware to ensure buggy malicious software isn’t causing it to crash.
Install Updated Drivers: An incorrectly installed or buggy driver can lead to crashes. Download the latest drivers for your computer’s hardware from your computer manufacturer’s website and install them — this may fix BSODs caused by driver problems.
Boot Into Safe Mode: If your computer is blue-screening every time you turn it on, try booting into safe mode. In safe mode, Windows loads only the essential drivers. If a driver you’ve installed is causing Windows to blue screen, it shouldn’t do so in safe mode. You can work on fixing the problem from safe mode.
Check for Hardware Problems: Blue screens can be caused by faulty hardware in your computer. Try testing your computer’s memory for errors and checking its temperature to ensure that it isn’t overheating. If that fails, you might need to test other hardware components—or hire a pro to do it for you.
Reinstall Windows: Resetting Windows—or performing a clean install—is the nuclear option. It will blow away your existing system software, replacing it with a fresh Windows system. If your computer continues to blue screen after this, you likely have a hardware problem.
A computer in proper working state shouldn’t blue-screen at all, but no software or hardware is perfect. Even a properly functioning computer may blue screen on rare occasions for no apparent reason—possibly as the result of rare driver bugs or hardware issues. If your computer is regularly blue-screening, you have a problem. If you encounter a blue screen once every two years, don’t worry about it.